Setting Up a Proper Windows Development Environment
07/03/2026
Learn how to configure Windows for development including Developer Mode, Dev Drive, and essential tools for a fast coding environment.
Out of the box, Windows is designed for general users, not developers.
That means it prioritizes safety, consumer applications, and compatibility — all reasonable things — but it also introduces friction for anyone trying to build software.
The good news is Windows now includes several developer-focused features that dramatically improve performance and workflow.
In this guide we'll configure:
- Windows Developer Mode
- A Dev Drive for faster builds
- Terminal and PowerShell improvements
- A few foundational tools every Windows developer should install
Once configured, Windows becomes a surprisingly powerful development platform.
For a full walkthrough with images check out [https://learn.microsoft.com/en-gb/windows/dev-drive/](Microsoft's documents).
Step 1: Enable Windows Developer Mode
The first thing you should do is enable Developer Mode.
Developer Mode unlocks several features that make development smoother, including:
- Installing apps from any source
- Enabling symbolic links without admin permissions
- Better debugging tools
- Improved support for development workflows
How to enable Developer Mode
- Open Settings
- Navigate to:
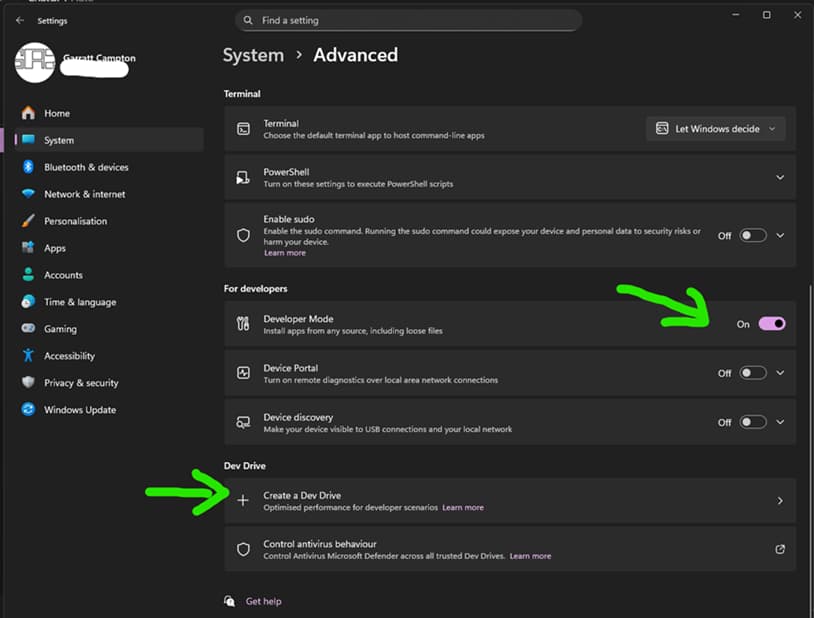
terminal System → Advanced - Scroll down to For developers
- Toggle Developer Mode → ON
Once enabled, Windows removes several restrictions that can slow development work.
For example, many JavaScript tools (including Node.js build systems and monorepos) rely heavily on symlinks, which normally require administrator privileges unless Developer Mode is enabled.
Step 2: Create a Windows Dev Drive
One of the most interesting additions to Windows is the Dev Drive.
Microsoft introduced Dev Drive to solve a problem developers constantly run into:
Antivirus scanning and filesystem overhead slowing down builds.
Dev Drive uses a technology called ReFS (Resilient File System) and special optimization rules designed specifically for developer workloads.
These workloads typically include:
- Large Git repositories
- Thousands of small files
- Frequent read/write operations
- Build systems and package managers
Benefits of Dev Drive
A Dev Drive can significantly improve performance for:
- npm / pnpm installs
- Rust builds
- C++ compilation
- large monorepos
- Docker builds
Microsoft reports improvements of up to 30% faster build times in some workloads.
Official documentation: https://learn.microsoft.com/en-gb/windows/dev-drive
How to Create a Dev Drive
- Open Settings
- Navigate to:
System → Advanced → Dev Drive
- Click:
Create a Dev Drive
- Choose one of the options:
- Create a new VHD Dev Drive
- Use unallocated disk space
- Convert an existing drive
For most developers the easiest option is:
Create a VHD Dev Drive
This creates a virtual disk optimized for development workloads.
Recommended Dev Drive Setup
Example configuration:
Drive letter: D:
Size: 100–500GB
File system: ReFS
Usage: development projects only
Your directory structure might look like:
D:\dev
D:\dev\projects
D:\dev\experiments
D:\dev\ai
D:\dev\repos
Keeping all code inside a Dev Drive ensures build systems run as efficiently as possible.
Step 3: Install Windows Terminal
The default Windows terminal used to be… unpleasant.
Fortunately Windows Terminal fixes that.
Install it from the Microsoft Store.
Windows Terminal provides:
- GPU accelerated rendering
- Tabbed terminals
- Multiple shells
- Custom themes
- Better copy/paste behavior
You can run multiple environments such as:
- PowerShell
- Command Prompt
- WSL
- SSH sessions
Step 4: Configure PowerShell for Development
Modern Windows development typically uses PowerShell as the default shell.
Check that PowerShell script execution is enabled.
Run PowerShell as administrator and execute:
Set-ExecutionPolicy RemoteSigned
This allows local scripts to run while maintaining reasonable security.
Many developer tools rely on PowerShell scripts for installation and automation.
Step 5: Install Essential Development Tools
With Windows configured properly, the next step is installing core tools.
Git
https://git-scm.com
Git is required for version control and collaboration.
Node.js
If you work in modern web development, install Node.js.
Recommended:
https://nodejs.org
Or use a version manager such as:
nvm-windows
Visual Studio Code
VS Code is currently the most popular development editor. Seriously, even for diehard Linux fans. It just does everything right.
https://code.visualstudio.com
Recommended extensions:
- GitHub Copilot
- ESLint
- Prettier
- Tailwind IntelliSense
- Docker
- Markdown Preview
Step 6: Keep Projects Inside the Dev Drive
The final step is a simple but powerful habit.
Put all development projects inside your Dev Drive.
Example:
D:\dev\projects\my-nextjs-app
D:\dev\projects\crypto-backtest-engine
D:\dev\experiments\ai-agents
This keeps builds fast and avoids unnecessary antivirus scanning.
...and we are DONE!
Windows has quietly become an excellent development platform.
With Developer Mode enabled and a Dev Drive configured, you gain:
- Faster builds
- Fewer permission issues
- Better filesystem performance
- Cleaner project organization
Small configuration choices compound over time.
Five minutes of setup today might save hundreds of hours of frustration over the life of a project.
And if you're building software every day, those gains are enormous.